
Inspire Me Thursday Digital Collage Tutorial.
 I am quite new to digital art but I find it so inspiring. With photoshop being such a huge program no matter your ability and comfort with working digital, learning photoshop can seem so daunting. It helps me to just focus on one aspect at a time. I am just going to show you how to make your own photoshop brushes and then use those to make a small digital collage. Photoshop brushes are like virtual rubber stamps. The right brush can do wonders to a piece of art or just spruce up the background perfectly. You can even make your own fabulous versions of the lovely Basic Grey papers to print out for backgrounds in traditional cut and paste collage.
 If you don’t have a digital program you can sometimes pick up older versions of photoshop or photoshop elements on eBay for a good price. Or you can download it free for a month http://www.adobe.com/products/tryadobe/main.jsp#p39 If you want to try a free program that has some of photoshops capabilities you can download Gimp. Not the easiest thing to download but it is a powerful free program. http://gimp-win.sourceforge.net/stable.html
Okay on to the tutorial. Lets make our first brush. You can use any image you want, but for the purpose of this tutorial I would recommend downloading and using the same images I used for this tutorial. You can download them at http://www.picturetrail.com/tartx The folder titled Inspire Me Thursday just right click on the images to save them.
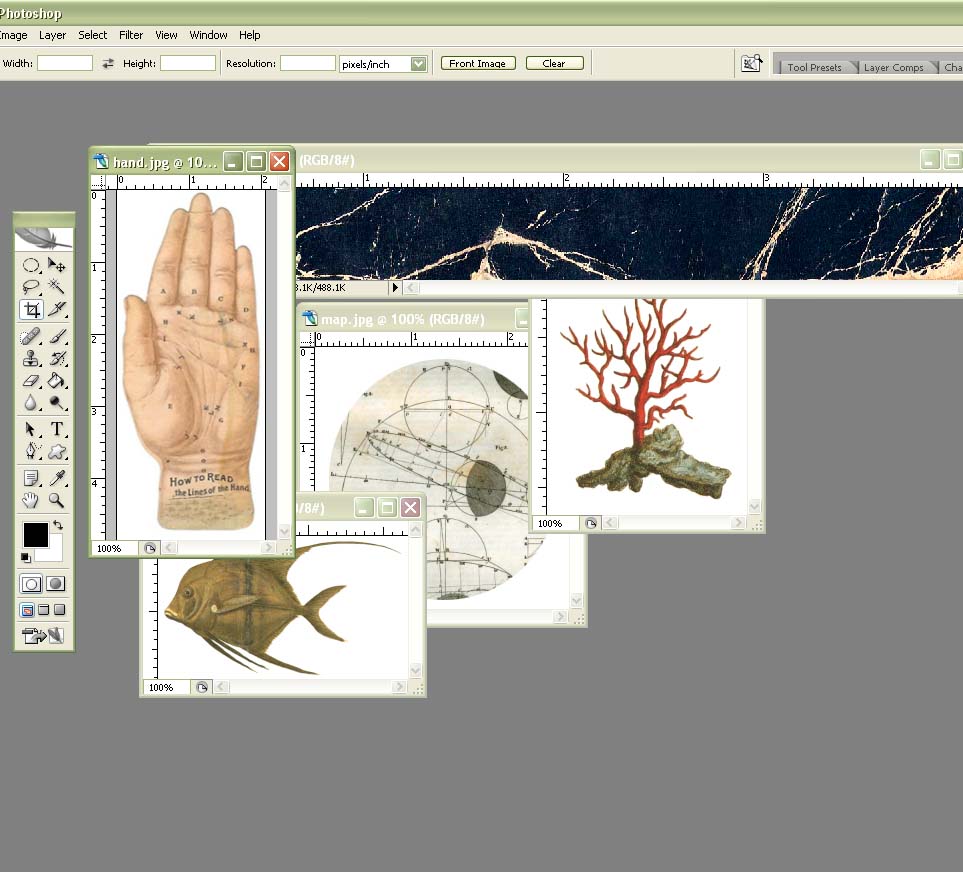
Now open up photoshop. I like to open all of the images up and lay them out so I can see them all on my screen.
I started with the image named coral but it does not matter what image you open first. Select the brush tool by mouse or by pressing B on your keyboard.

 There you go! Your first brush is made. Go through and do the same thing for the fish, hand and map image. (Select Edit > Define Brush Preset.
Now lets make a word or phrase brush. Create a new photoshop document by going to File > New. Set your size to 200 pixels x 100 pixels at 300 dpi.resolution, with a white background. Select the type tool on your tool palatte with your mouse or by pressing T on your keyboard.
There you go! Your first brush is made. Go through and do the same thing for the fish, hand and map image. (Select Edit > Define Brush Preset.
Now lets make a word or phrase brush. Create a new photoshop document by going to File > New. Set your size to 200 pixels x 100 pixels at 300 dpi.resolution, with a white background. Select the type tool on your tool palatte with your mouse or by pressing T on your keyboard. 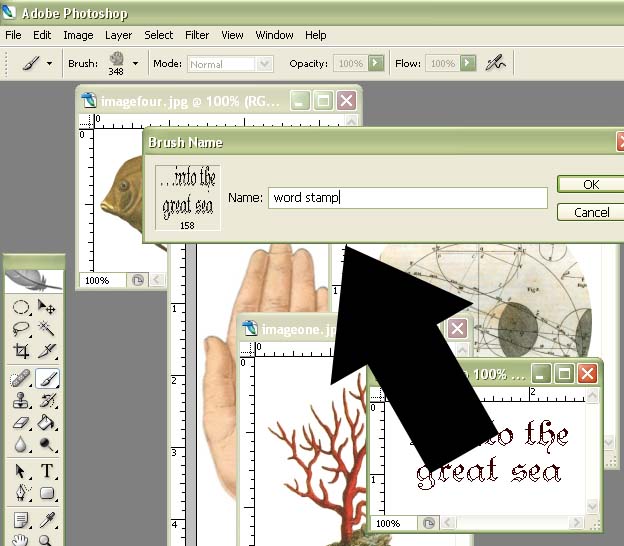 Create a text box (writing space) on your document by holding the left button on your mouse and dragging out a box large enough to type a few words. Choose a font you like from your top toolbar and then type in the text box any word or phrase that you want to make a brush of. Make sure the brush tool is selected (B on your keyboard) and then save it by selecting Edit > Define Brush Preset.
Lets finish our set of brushes by making a grunge brush. I love how these add texture and age to pieces. Open the file named grunge. This is a scan from a piece of an old worn out book. I am working with a dark background with light-colored scratches, so I invert the colors (control-I or on the toolbar Image> Adjustments> Invert. If you're working on a light colored background with dark lines, don't invert.
Create a text box (writing space) on your document by holding the left button on your mouse and dragging out a box large enough to type a few words. Choose a font you like from your top toolbar and then type in the text box any word or phrase that you want to make a brush of. Make sure the brush tool is selected (B on your keyboard) and then save it by selecting Edit > Define Brush Preset.
Lets finish our set of brushes by making a grunge brush. I love how these add texture and age to pieces. Open the file named grunge. This is a scan from a piece of an old worn out book. I am working with a dark background with light-colored scratches, so I invert the colors (control-I or on the toolbar Image> Adjustments> Invert. If you're working on a light colored background with dark lines, don't invert. 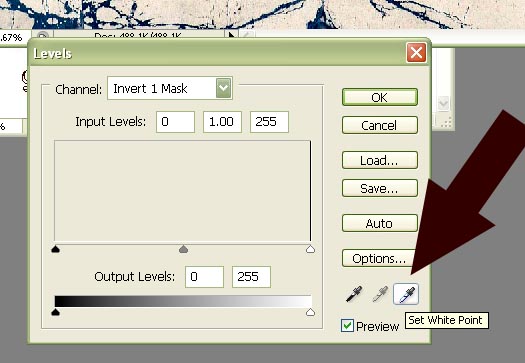 There is still quite a bit of color left so I want to get rid of some of that. Image > Adjustments > Levels. Click on the white eye-dropper tool and then click once within the cream color that is left in the grunge file. This gives the image a lot more contast. Then to get rid of the cream color that is left in between the lines, grab the magic eraser tool and click within some of the cream sections until all that is left are some of the bolder blue lines and spots.
  Taking the regular eraser tool I also randomly erased some of the edges and fine lines that I did not want. When you are happy with the pattern you are left with then save the brush.
 Make sure your brush is selected by using your mouse or clicking B on your Keyboard. Then save the brush by clicking Edit > Define Brush Preset.
When you are done making all the brushes, you want
Make sure your brush is selected by using your mouse or clicking B on your Keyboard. Then save the brush by clicking Edit > Define Brush Preset.
When you are done making all the brushes, you want  to save them as a brush library (or set). To do that click on the little arrow in a circle on the top toolbar where it says Brushes and Choose Save brushes > enter name click save and there are your brushes in that set.
Now lets lets try them out. Create a new photoshop document by going to File > New. Set your size to 500 pixels x 500 pixels at 300 dpi.resolution, with transparent background selected.
to save them as a brush library (or set). To do that click on the little arrow in a circle on the top toolbar where it says Brushes and Choose Save brushes > enter name click save and there are your brushes in that set.
Now lets lets try them out. Create a new photoshop document by going to File > New. Set your size to 500 pixels x 500 pixels at 300 dpi.resolution, with transparent background selected. 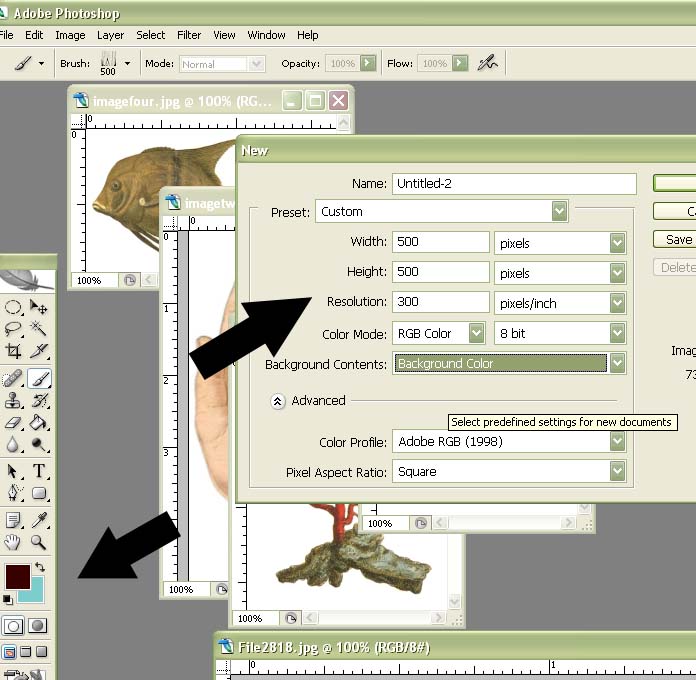 When you first open a new document, you have a background layer. We will be opening new layers to put on top of the background layer. Layers are like virtual transparency sheets. It is always a good idea to not place anything on your background layer as it is not editable. Think of it as a piece of cardstock you put the pieces of your collage on top of.
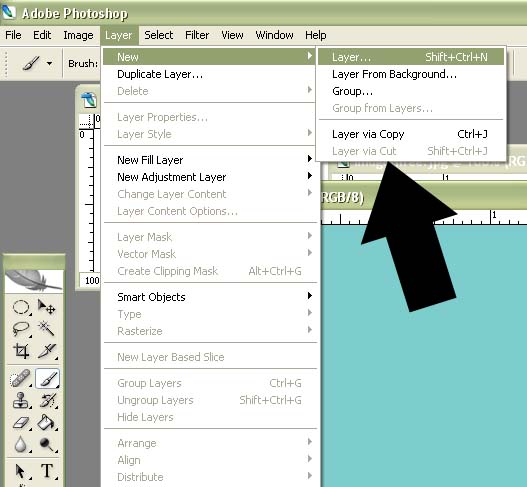 So to make an editable layer go to the menu bar and chose Layers > New > Layer and click ok. This will make a transparent layer the same size as your current document for you to work with. You can see this layer and your background in the layer palette. If your layer palette is not open you can open it by going to the top toolbar and selecting Window > Layers. You will see it pop up on your screen.
On the tool palette click on the colored squares. If you click on one of the squares it will open the “Color Picker”. Change the foreground color to whatever color you want or in my case I changed it to #99cccc. Then click the paint can in the tool bar palette then click on your new layer in your canvas and it will change it to that color.
We are now ready to try our brushes. I changed the foreground color to #330000.
The great thing about using brushes is by changing what your foreground color is you can then use your brush to “stamp” the canvas in that color. It is like having tons of different color ink pads at your disposal.
So to make an editable layer go to the menu bar and chose Layers > New > Layer and click ok. This will make a transparent layer the same size as your current document for you to work with. You can see this layer and your background in the layer palette. If your layer palette is not open you can open it by going to the top toolbar and selecting Window > Layers. You will see it pop up on your screen.
On the tool palette click on the colored squares. If you click on one of the squares it will open the “Color Picker”. Change the foreground color to whatever color you want or in my case I changed it to #99cccc. Then click the paint can in the tool bar palette then click on your new layer in your canvas and it will change it to that color.
We are now ready to try our brushes. I changed the foreground color to #330000.
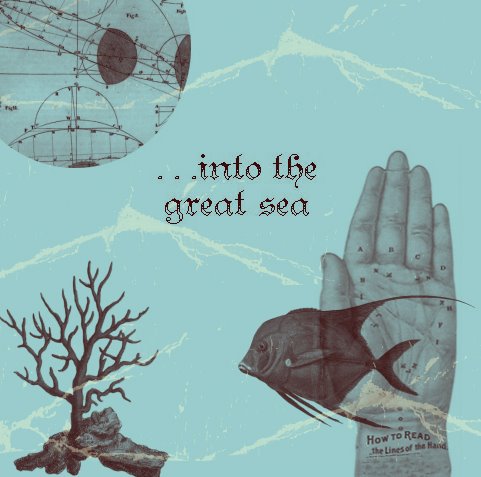
The great thing about using brushes is by changing what your foreground color is you can then use your brush to “stamp” the canvas in that color. It is like having tons of different color ink pads at your disposal.  Before you pick your brush it is a good idea to get used to making a new layer for each brush or item in case you change your mind. That way you can always adjust or delete just that one image. Click on the brush tool or press B and you will see under the top toolbar some options for the brush are available. Where it says Brush click the small arrow to see your brush choices. Choose what brush you want and place it on the canvas wherever you would like. Now grab one of the other brushes you made by clicking on the tiny arrow by the word Brush. (Remember to make a new layer for each brush. Go to the menu bar and chose Layers > New > Layer and click ok). Continue to do this until you are happy with your collage.
*To get a watery effect before I placed the grunge stamp on the canvas I change the foreground color to #ffffcc and then after randomly stamping the canvas I made the fill level 35% in the layer toolbar.
If you want you can even go through and alter each layer to have different transparent effects.
Before you pick your brush it is a good idea to get used to making a new layer for each brush or item in case you change your mind. That way you can always adjust or delete just that one image. Click on the brush tool or press B and you will see under the top toolbar some options for the brush are available. Where it says Brush click the small arrow to see your brush choices. Choose what brush you want and place it on the canvas wherever you would like. Now grab one of the other brushes you made by clicking on the tiny arrow by the word Brush. (Remember to make a new layer for each brush. Go to the menu bar and chose Layers > New > Layer and click ok). Continue to do this until you are happy with your collage.
*To get a watery effect before I placed the grunge stamp on the canvas I change the foreground color to #ffffcc and then after randomly stamping the canvas I made the fill level 35% in the layer toolbar.
If you want you can even go through and alter each layer to have different transparent effects.
 When you are happy with your collage you can merge the layers by right clicking on any of the images in the layer palette and chosing Merge Visable. This will combine all of your layers into one. You can then save your new beautiful digital collage.
You can EVEN save this whole collage you just did as a brush by following the same instructions. Make sure the brush tool is selected and then Edit > Define Brush Preset. Now the whole collage you just did is a brush!
Viva Inspire Me Thursday! xo Tiffini Elektra X
When you are happy with your collage you can merge the layers by right clicking on any of the images in the layer palette and chosing Merge Visable. This will combine all of your layers into one. You can then save your new beautiful digital collage.
You can EVEN save this whole collage you just did as a brush by following the same instructions. Make sure the brush tool is selected and then Edit > Define Brush Preset. Now the whole collage you just did is a brush!
Viva Inspire Me Thursday! xo Tiffini Elektra X
posted by navylane at 6:58 PM
![]()

9 Comments:
AWESOME! Thanks!
Great tutorial! Easy to follow and concise.
You rock!! Thanks so much for doing this.
Terrific tutorial. I am always amazed and so appreciative when people take the time to share their skill and talents as you have here. Thank you.
many thanks..i could never figure that one out!
this is a fantastic tutorial!!!
You are Godesses!!! Thank you!!!!
Hello:
Thank you for embracing digital.
I've been doing digital for 2 years now.
Here's a collage I made last month for Lent.
http://mphoinix.blogspot.com/2006/04/34-day-of-lent-21-day-challenge.html
TFL
Maggie
Oh My! I'm new to your blog. I LOVE digital collage & I'm sure I still have so much to learn. Can't wait to try your brushes techniques. Thanks for sharing!
Post a Comment
<< Home